four beginner tips to quickly level up your photography
After weeks—or maybe months—of research, you finally did it: you invested your hard-earned money into buying a digital camera (or a smartphone with a fancy camera). It arrived in the mail (because buying a camera at a store is a rare thing these days), and you excitedly opened the packaging and powered it on for the first time. You basked in the light of the glorious LCD screen, pointed the camera at something—anything!—and pressed the shutter button to take your first photo. The shutter sound was extremely satisfying, and the picture you just took of your saltshaker looked…well…pretty good!
But what now? There are a million buttons and dials on your camera and thousands of resources out there about how to learn photography. Where do you begin?
First, congratulations on starting your photography journey! I’m excited for you! Second, don’t worry—it’s perfectly normal to feel a bit overwhelmed as a beginner. Photography is an incredibly rewarding art form, and while the learning curve may appear steep at first, I promise there are relatively easy ways to get started taking interesting photos right away.
So let’s get started.
Below are four tips for beginner photographers to quickly level up your photography. (And note that all of this stuff applies to phone camera shooters as well!)
Tip #1: Don’t Buy Any More Gear.
This one’s important.
Maybe your camera came with a lens, and some person on Youtube said you absolutely must upgrade to a more expensive lens immediately and also buy two or three more lenses to have in your quiver. Maybe another person on Reddit said you absolutely must buy this or that fancy camera bag; an expensive tripod; multiple filters for your lenses; the fastest possible memory cards; and annual subscriptions to Lightroom and Photoshop.
Please, do yourself a favor, and ignore the noise. The camera and lens that you have—right now—are absolutely 100% fine, and no new camera, lens, accessory, or editing software is going to make you take better pictures. Learn this fundamental fact early and never forget it: It’s the person behind the lens who makes a great photo, not the camera. Cameras are merely tools, and they should be treated as such.
Think of it this way. Would buying the most expensive paint, paintbrush, and canvas make you a good painter if you’re not already a good painter? Of course not. Yet the marketing folks at camera companies have us absolutely convinced that buying more and “better” gear will make us better photographers. Trust me on this one: It won’t. People have been taking amazing photos for over a hundred years, and they didn’t need the latest and greatest 60-megapixel monstrosity to do so. You (and I) don’t either.
As a beginner, it’s best to save your money, put aside gear envy, and learn to shoot great photos with the gear you already have. Because every second that you spend researching and buying gear is a second that you’re not spending actually getting better at photography. Avoid falling into the trap of “Gear Acquisition Syndrome” (or “GAS”) early, and you’ll already be ahead of dozens of your peers. Get a cheap neck or wrist strap, an inexpensive memory card, maybe an extra battery, and a cheap way to transfer your photos from your camera to your computer or phone, and you’re all set to get out there and start shooting. Commit to the gear you have for now and never blame the camera for bad photos, and you’ll be amazed at what you can learn.

My Ricoh GR III HDR.
As they say, the best camera is the one that you have with you. “Better” gear won’t make you a better photographer. Learn that now and save yourself a lot of trouble (and money!). Great photographers can take great photos with literally any camera. Gear matters very little.
Tip #2: It’s Perfectly Fine to Shoot in Fully Automatic Mode as a Beginner.
Aperture, shutter speed, ISO, the exposure triangle, all those dials and buttons—it can all feel a bit overwhelming in the beginning. Yet for some reason, many beginners feel that it’s wrong to shoot in any other mode than fully manual. “Real photographers,” the average beginner thinks, “shoot in manual mode all the time, so I must do the same.”
This is false, and I hope that’s a relief. If you’re new to photography, it’s absolutely 100% fine to shoot your camera in fully automatic mode. In fact, I highly recommend that you do exactly that as your starting out. The exposure triangle is important—but there are a million other things that make up a great photo, including light, color, composition, story, emotion—the list goes on. In your early days, it’s much better—and a lot more fun—to focus on these fundamentals first instead of getting bogged down and frustrated by trying to manually control all three elements of the exposure triangle. There’s plenty of time to learn all that stuff, and the more you master the other fundamentals early, the more the exposure triangle will make sense later, and the more you’ll be able to use it artistically to get the photos that you want down the road, where you’ll experience the joy of shooting in aperture and shutter priority (partially automatic modes that many, many pros use on a daily basis). Put all that aside for now, pop your camera into fully automatic mode, and get out there and start shooting.
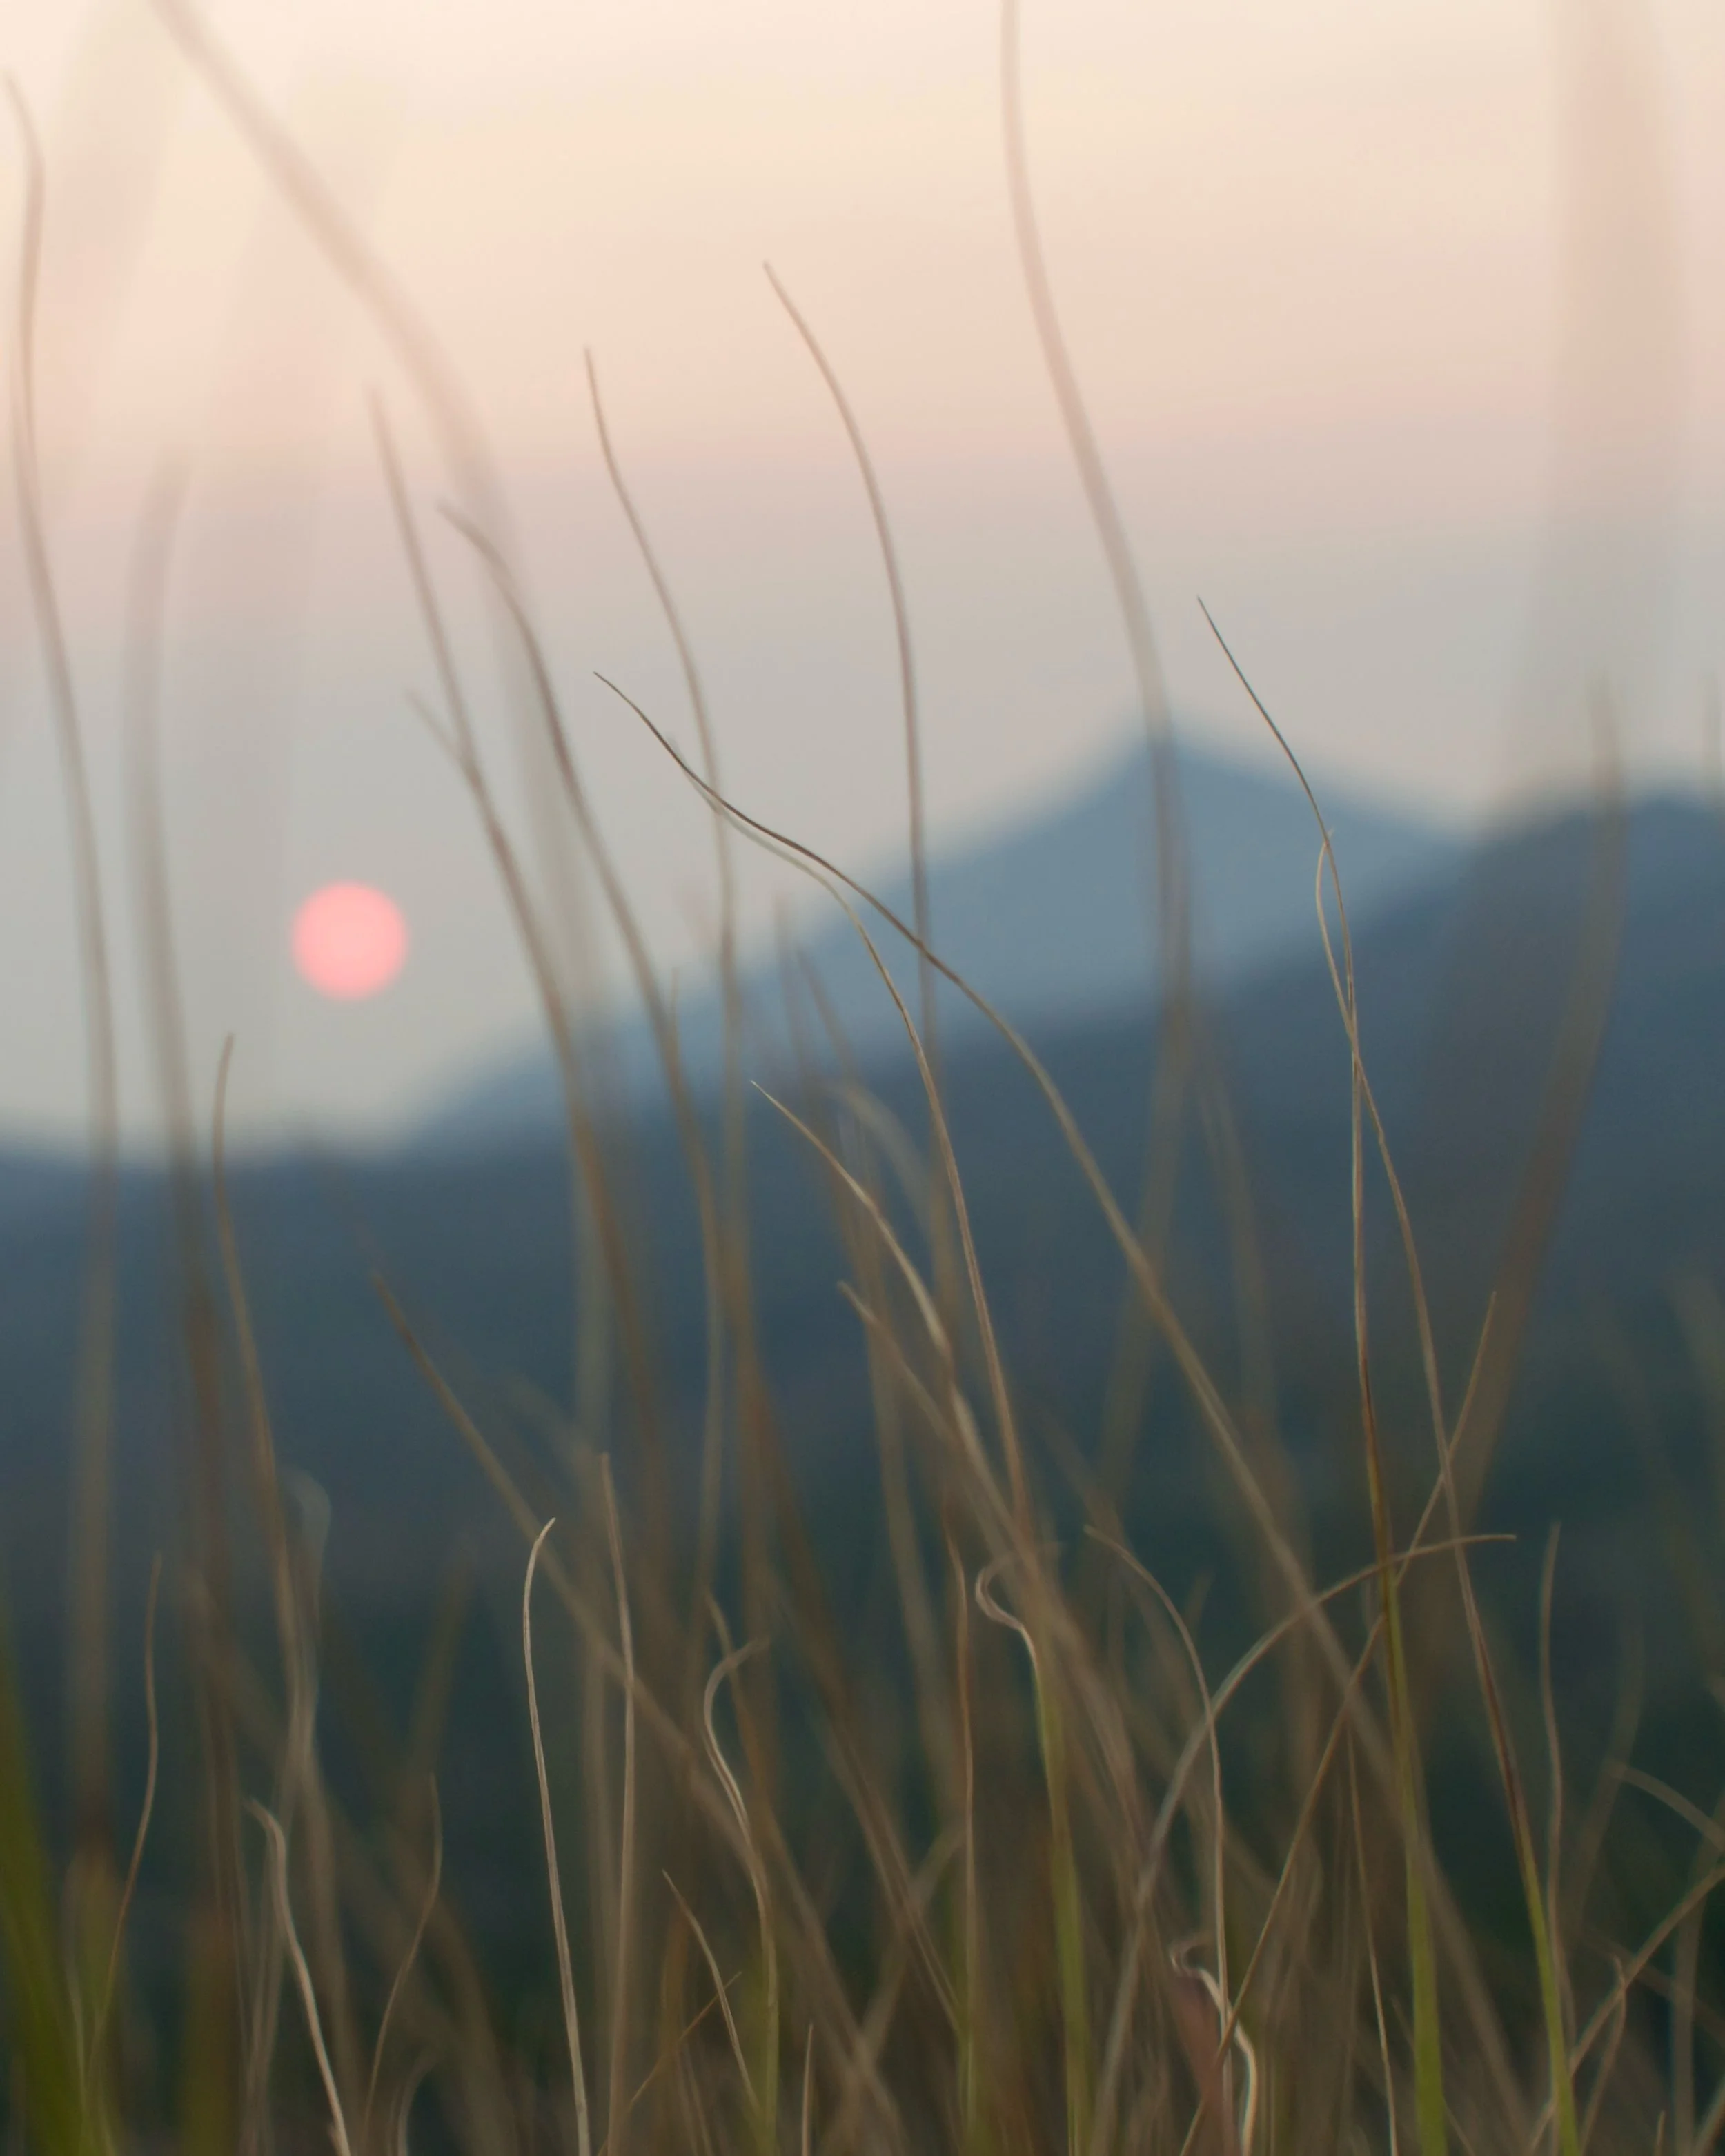
Smoky sunrise in Glacier National Park on the CDT.
I really like this photo and will cherish it forever. Guess what? I shot it while my camera was in fully automatic mode. Who cares? I certainly don’t.
Tip #3: Focus Your Efforts on Learning Composition.
When all the elements of a photo come together to make an interesting photo—the lighting, the colors, the subject, the background—that’s called composition. And I’m here to tell you that, with the camera and lens that you currently have, you too can take interesting, well-composed photos—right now.
Here are a few guidelines to get you started, with image samples at the end.
Find an interesting subject. We are drawn to photography because of its ability to show us something that we don’t normally see. So find an interesting subject to shoot! How? “Interesting” is, of course, subjective, so what I mean is this: Find a subject that you find interesting. Photography is about expressing yourself and showing the world your unique vision and experience. So maybe you collect stamps, enjoy motorcycles, bake amazing cookies, or (like me) really enjoy hiking. There you go! Those are interesting subjects, and your specialized knowledge will allow you to show your viewers something unique about those subjects. Don’t go take pictures of random flowerpots or cars or stop signs or your neighbor’s fence if those things don’t interest you. Find something that you love and share it with the world through your photography and unique point of view. Whenever you point your camera at something, ask yourself: Do I find this subject interesting? If not, either find a way to make that subject interesting, or move on and find something else.
It’s all about perspective. Ok, so we’ve got an interesting subject to shoot. What next? My advice is to analyze the perspective from which you want to shoot your subject. Let’s say I’m photographing a cool vintage car. I could simply stand next to the car, bring the viewfinder up to my eye level, and snap a photo. But that’s not very interesting, is it? Why? Because taking photos of things at eye level shows us a perspective that all humans, across the world, see every single day, all day long. So how do you fix this? By moving around and doing weird things with your camera! Don’t just stand there and shoot things from eye level. Back away from the car, take a knee, and put the camera literally right above the ground, aiming up at the car, and take a photo. Interesting perspective, right? Now do the opposite. Find a way to get above the car, maybe on a hill or a staircase or literally just hold the camera way above your head looking down at the subject, and take a photo. Interesting perspective, right? There are a million ways to get creative with this. Just remember: While shooting at eye-level is fine sometimes, many times there are much more interesting perspectives to show your viewers. Show me something that my own eyes don’t see every single day. Try it out.
Use foreground elements to frame your subject and create depth in your image. Great images often use foreground elements to frame their subjects and create depth (a 3-D look). So how do you do that? You do it by shooting through things. Here’s an example. You’ve found a cool perspective from which to shoot your vintage car—now go into the bushes (yes, go into the bushes) and take photos of the car through the bushes, using the leaves to create a nice frame for your subject. The leaves of the bushes are now much closer to the lens than the car is, so they appear blurry and closer to the viewer, while the car now appears farther away and in focus. Neat! We’ve created depth in our image—the feeling that the viewer is standing in the scene, looking at the car in multiple dimensions. Again, there are a million ways to get creative here—shoot through fences, bookshelves, flowers—heck, you can even use people as your foreground elements. Mess around with it and see what you can come up with—the possibilities are endless.
Learn the “rule” of thirds and then break it. Now we’ve got an interesting subject, shot from an interesting perspective, using interesting foreground elements that create depth. But where do we place our subject in the frame to make things even more interesting? The natural response is “right in the center,” right? Hmm. You might be surprised to learn that placing the subject right in the center of the photo is often the least interesting way to frame your subject. So what do you do? Luckily, there is a composition guideline that’s great for beginners called the “rule” of thirds. Basically, the “rule” says that you place the most interesting part of your photo at the intersections of a 3x3 grid (your camera probably has this grid built in, read the manual). This website has a great description of the “rule” with sample images, and I highly recommend that you read it: What is the Rule of Thirds? A Guide for Beginners. I put the word “rule” in quotation marks because it’s not really a “rule”—there are no rules in photography. Photography is an artform, after all. So master the “rule,” and then break it! The key is learning to place your subject with intention, in the area of the frame that creates the most balance and emphasis, and the “rule” of thirds is a good way to start learning how to do that.
Play with the light. Lighting is everything in photography. Photography actually means playing with light (or something like that…). Great lighting can make boring subjects look amazing, and bad lighting can make great subjects look terrible. Luckily, there’s a huge and dynamic light source available to us every day, including on cloudy days, to experiment with. It’s called the Sun. So always be on the lookout for interesting light! Shooting at sunrise or sunset can be a great start, as the light is often warm, soft, and directional. But shooting at high noon can also produce some really interesting results, where, for example, hard light passes through windows or doorframes in interesting ways. Get out there in all sorts of conditions, and when you see the light doing cool, interesting things, try to capture it in cool, interesting ways.
Frame with intention. Let’s return to our painting analogy. Painters meticulously choose every single element that goes into their work, ensuring that every aspect of the image emphasizes, and does not distract from, the painting’s subject and the story that they’re trying to tell. Photographers do the same exact thing. Try it out. Next time you point your camera at a (nonmoving) subject, don’t just snap the photo mindlessly. Take a few minutes and analyze every single detail of the image through your viewfinder. Are there random tree branches or street signs or brightly lit random items at the edges of the photo, or sticking out of your subject’s head, that distract from your subject? Get rid of them by reframing your image. Try to make every single element of your photo—even the tiniest details—emphasize, rather than distract from, your subject and the story that you’re trying to tell.
Patience is key. Say you’ve stumbled onto a scene that you think is beautiful. A warmly lit street corner at blue hour or a great view on a hiking trail at dawn. You could just take a photo of the empty scene and move on, and it might even be interesting. But one way to add interest to that already-beautiful scene is to patiently wait for a subject to meander into it. Sure, a mountain vista is beautiful on its own—but showing a tiny person walking through that mountain vista is a great way to add interest to your scene, as it gives your viewer context about the scale and depth of the image. It also creates a sense of time—you’ve captured forever a microsecond of movement through space, and that’s pretty cool.
Straighten out those lines and don’t over-edit. Last one, and it’s easy. First, one of the quickest ways to make your photos look more polished is to simply straighten out the horizon lines in the editing software of your choice. Usually you can find a manual “straighten” feature in the “crop” section of your software (and for your first editing software, I recommend just using your phone’s phone built in photos app, free, powerful, and effective). If you’re going to have uneven horizons, do it intentionally for artistic effect—don’t do it because you forgot to straighten them! And second, don’t over-edit! It can be really tempting to boost the color saturation of that landscape photo you took to 95% and to jack up the contrast to create an HDR-like look—but ask yourself in editing, does this look natural, or does this look over-the-top and fake? The more you edit (and make mistakes!), the better your eye will get, and your taste for light editing will improve, so stick with it.
Here are some sample images with descriptions to help out.

Biblioteca Vasconcelos in Mexico City.
Here’s an example of using perspective to make a photo more interesting. I literally put my camera on the ground here, taking on the perspective of, say, a bug or a mouse. That’s why the floor looks close to the lens—because it is. This photo would have been fine taken at human-eye level—but I like it a lot more taken from down low because it shows me something my eyes don’t see every day and pushes my eye to the subjects (the people walking).

Albuquerque Balloon Fiesta.
Here’s an example of using foreground elements to frame your subject and add depth. Here, I put my camera near and right above the shoulder of the person taking a photo on their cell phone and focused my lens on the person waving in the balloon. This caused the foreground elements (the crowd) to blur, which pushes your eye directly to the subject (the people in the balloon), adds a sense of three-dimensionality, and makes you (I hope at least!) feel like you, as the viewer, are somehow in the crowd as well, even though you’re actually on your couch.

Tasty street tacos in Mexico City.
Here’s an example of the “rule” of thirds in action. The subject of my photo (the cook chopping pork) is not in the dead center of the photo—I placed him in the right third of the photo, and I also used the blurry person in the left third in dark shadow as a counterpoint to help emphasize my subject. The “rule” can create a nice sense of balance to a photo, and whoever came up with it is pretty smart in my book. After a while, you don’t even think about the fact that you’re using this “rule”—it just shows up in your images naturally, like it did in this one.
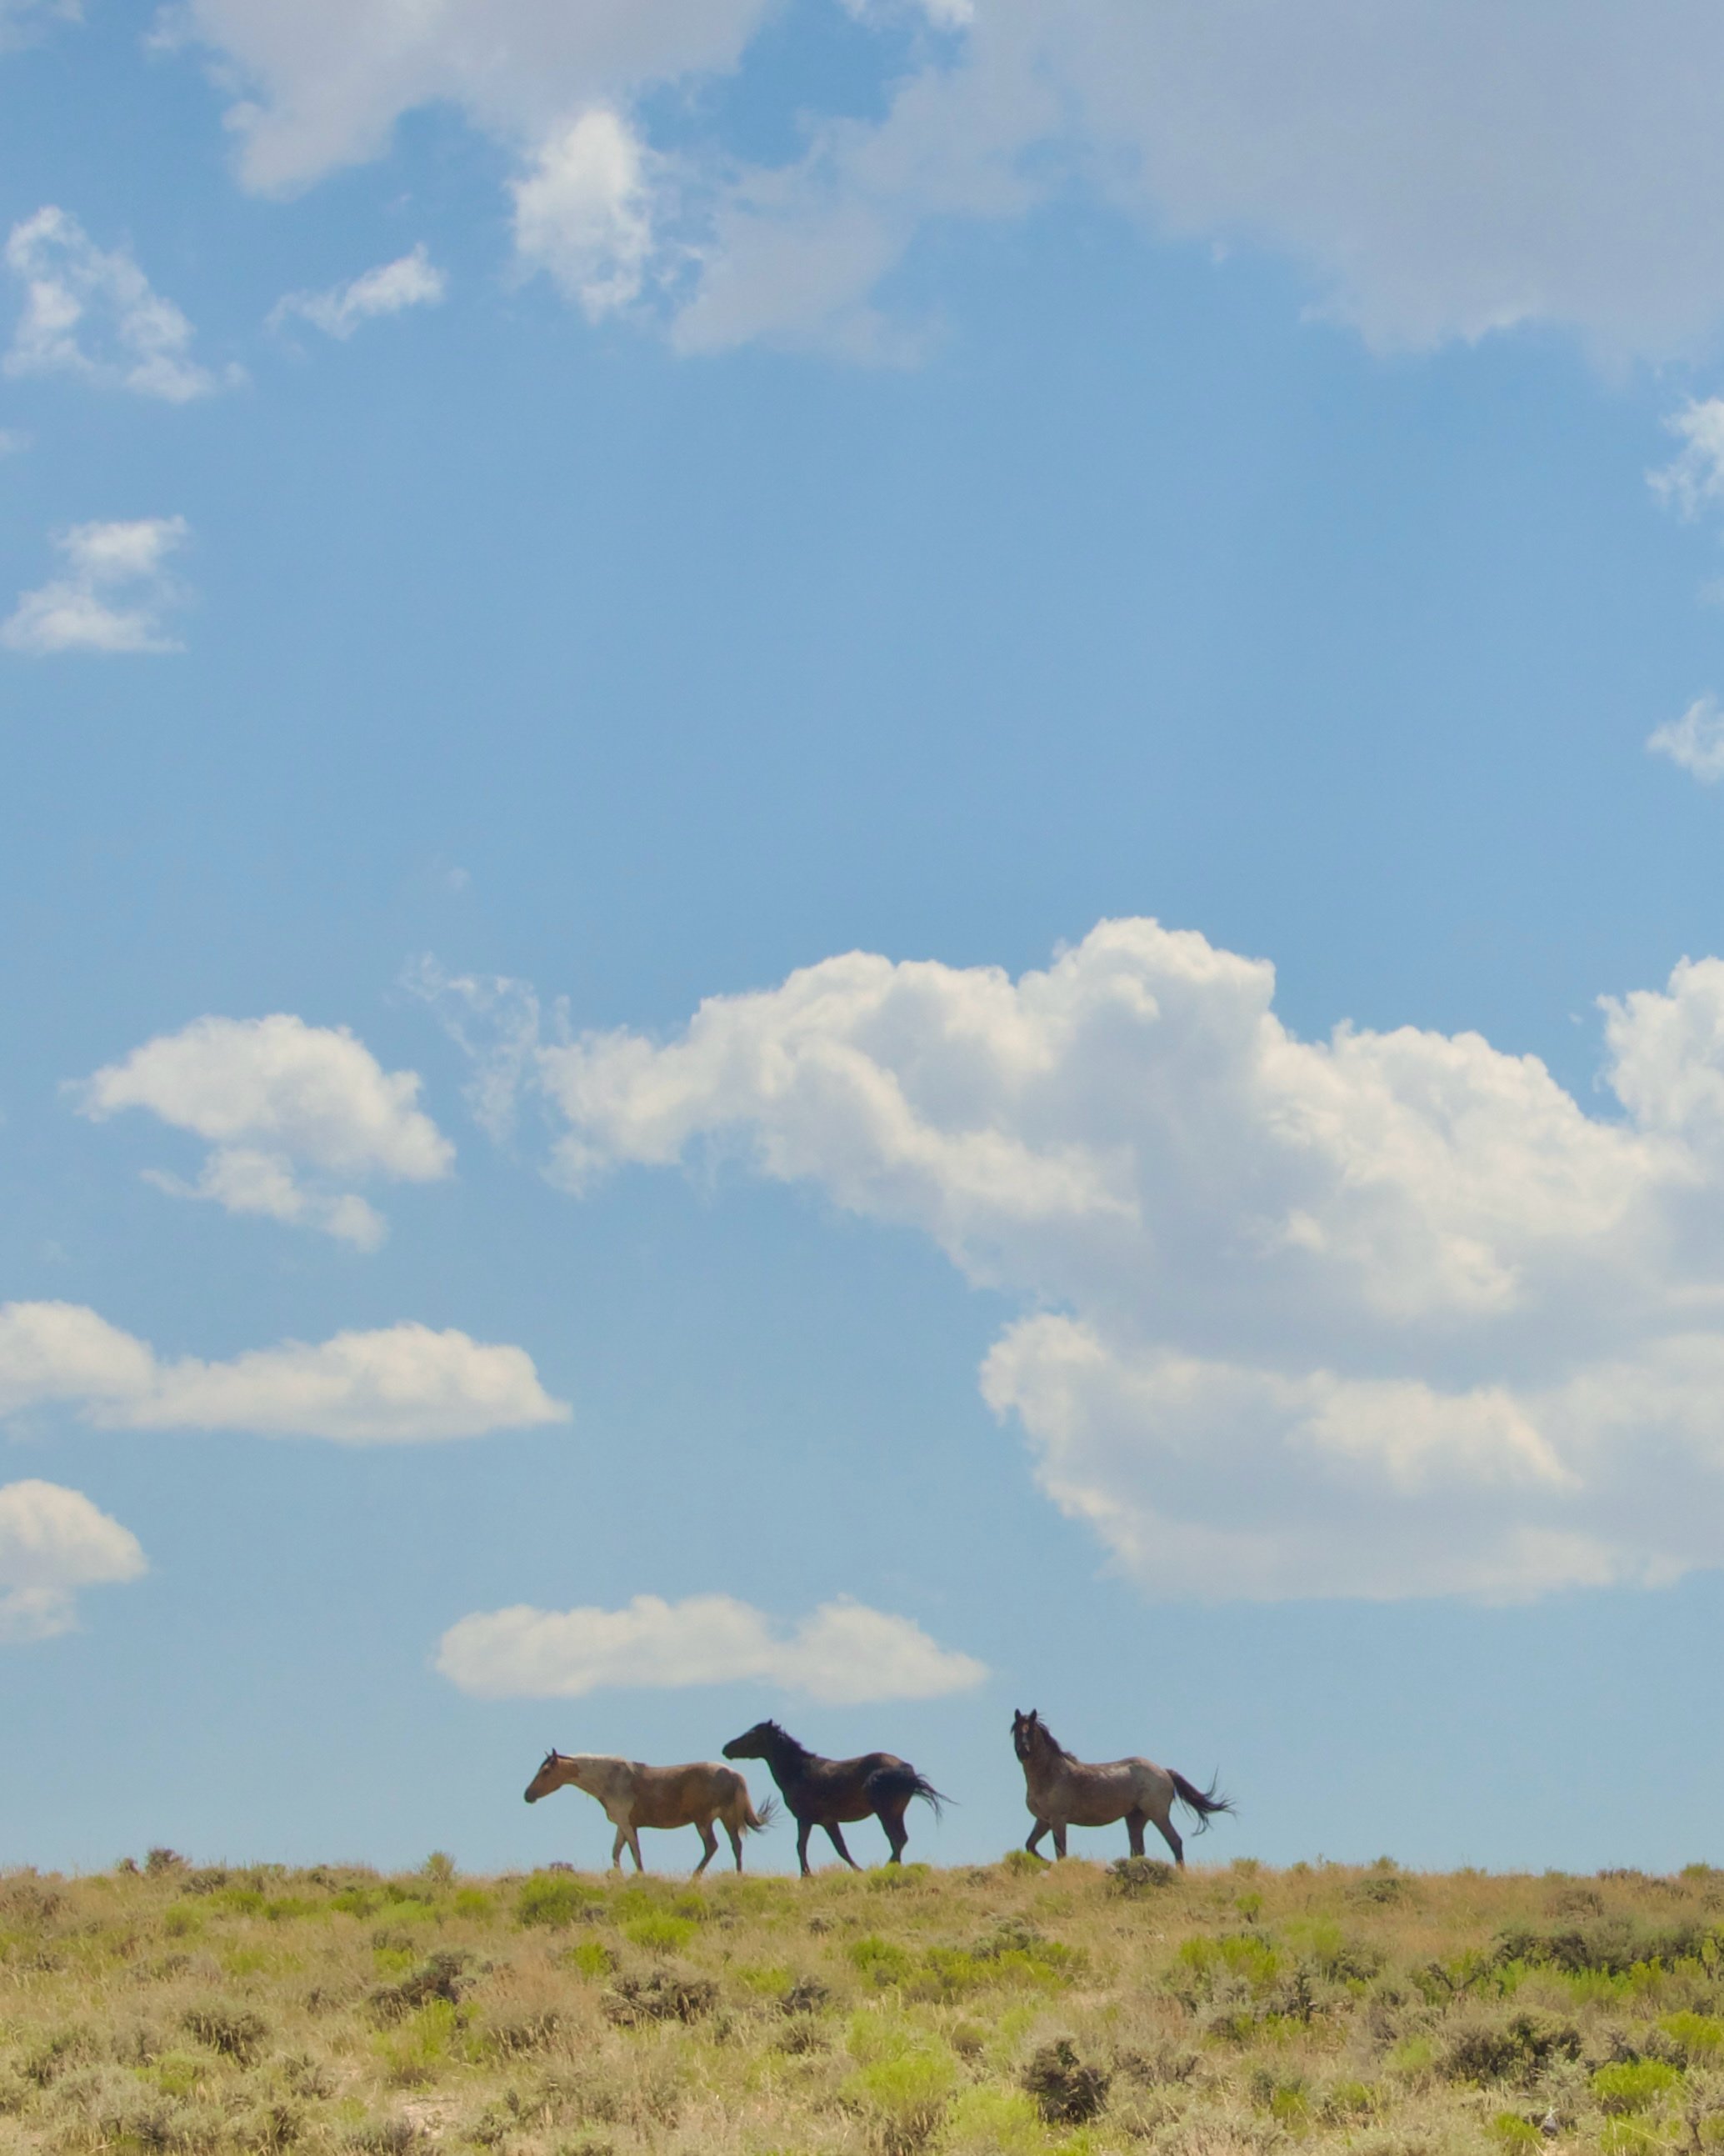
Wild horses on the CDT in Wyoming.
But remember: “Rules” are meant to be broken, and I sent the “rule” of thirds packing in this photo. Here, I placed my subjects (the horses) in the bottom fifth or sixth (or something like that) of the frame, dead center. Why? I honestly have no idea. My eye just told me that this works better, with tiny horses enveloped by a huge prairie blue sky covered with Toy Story clouds. Trust your instincts and ignore “rules” when it makes sense to do so. You’re the artist, and you have full control of your image. This image is also a good example of straightening your horizons. If the ground were crooked in this image, it would look weird and off balance. Be a perfectionist (or close to one).
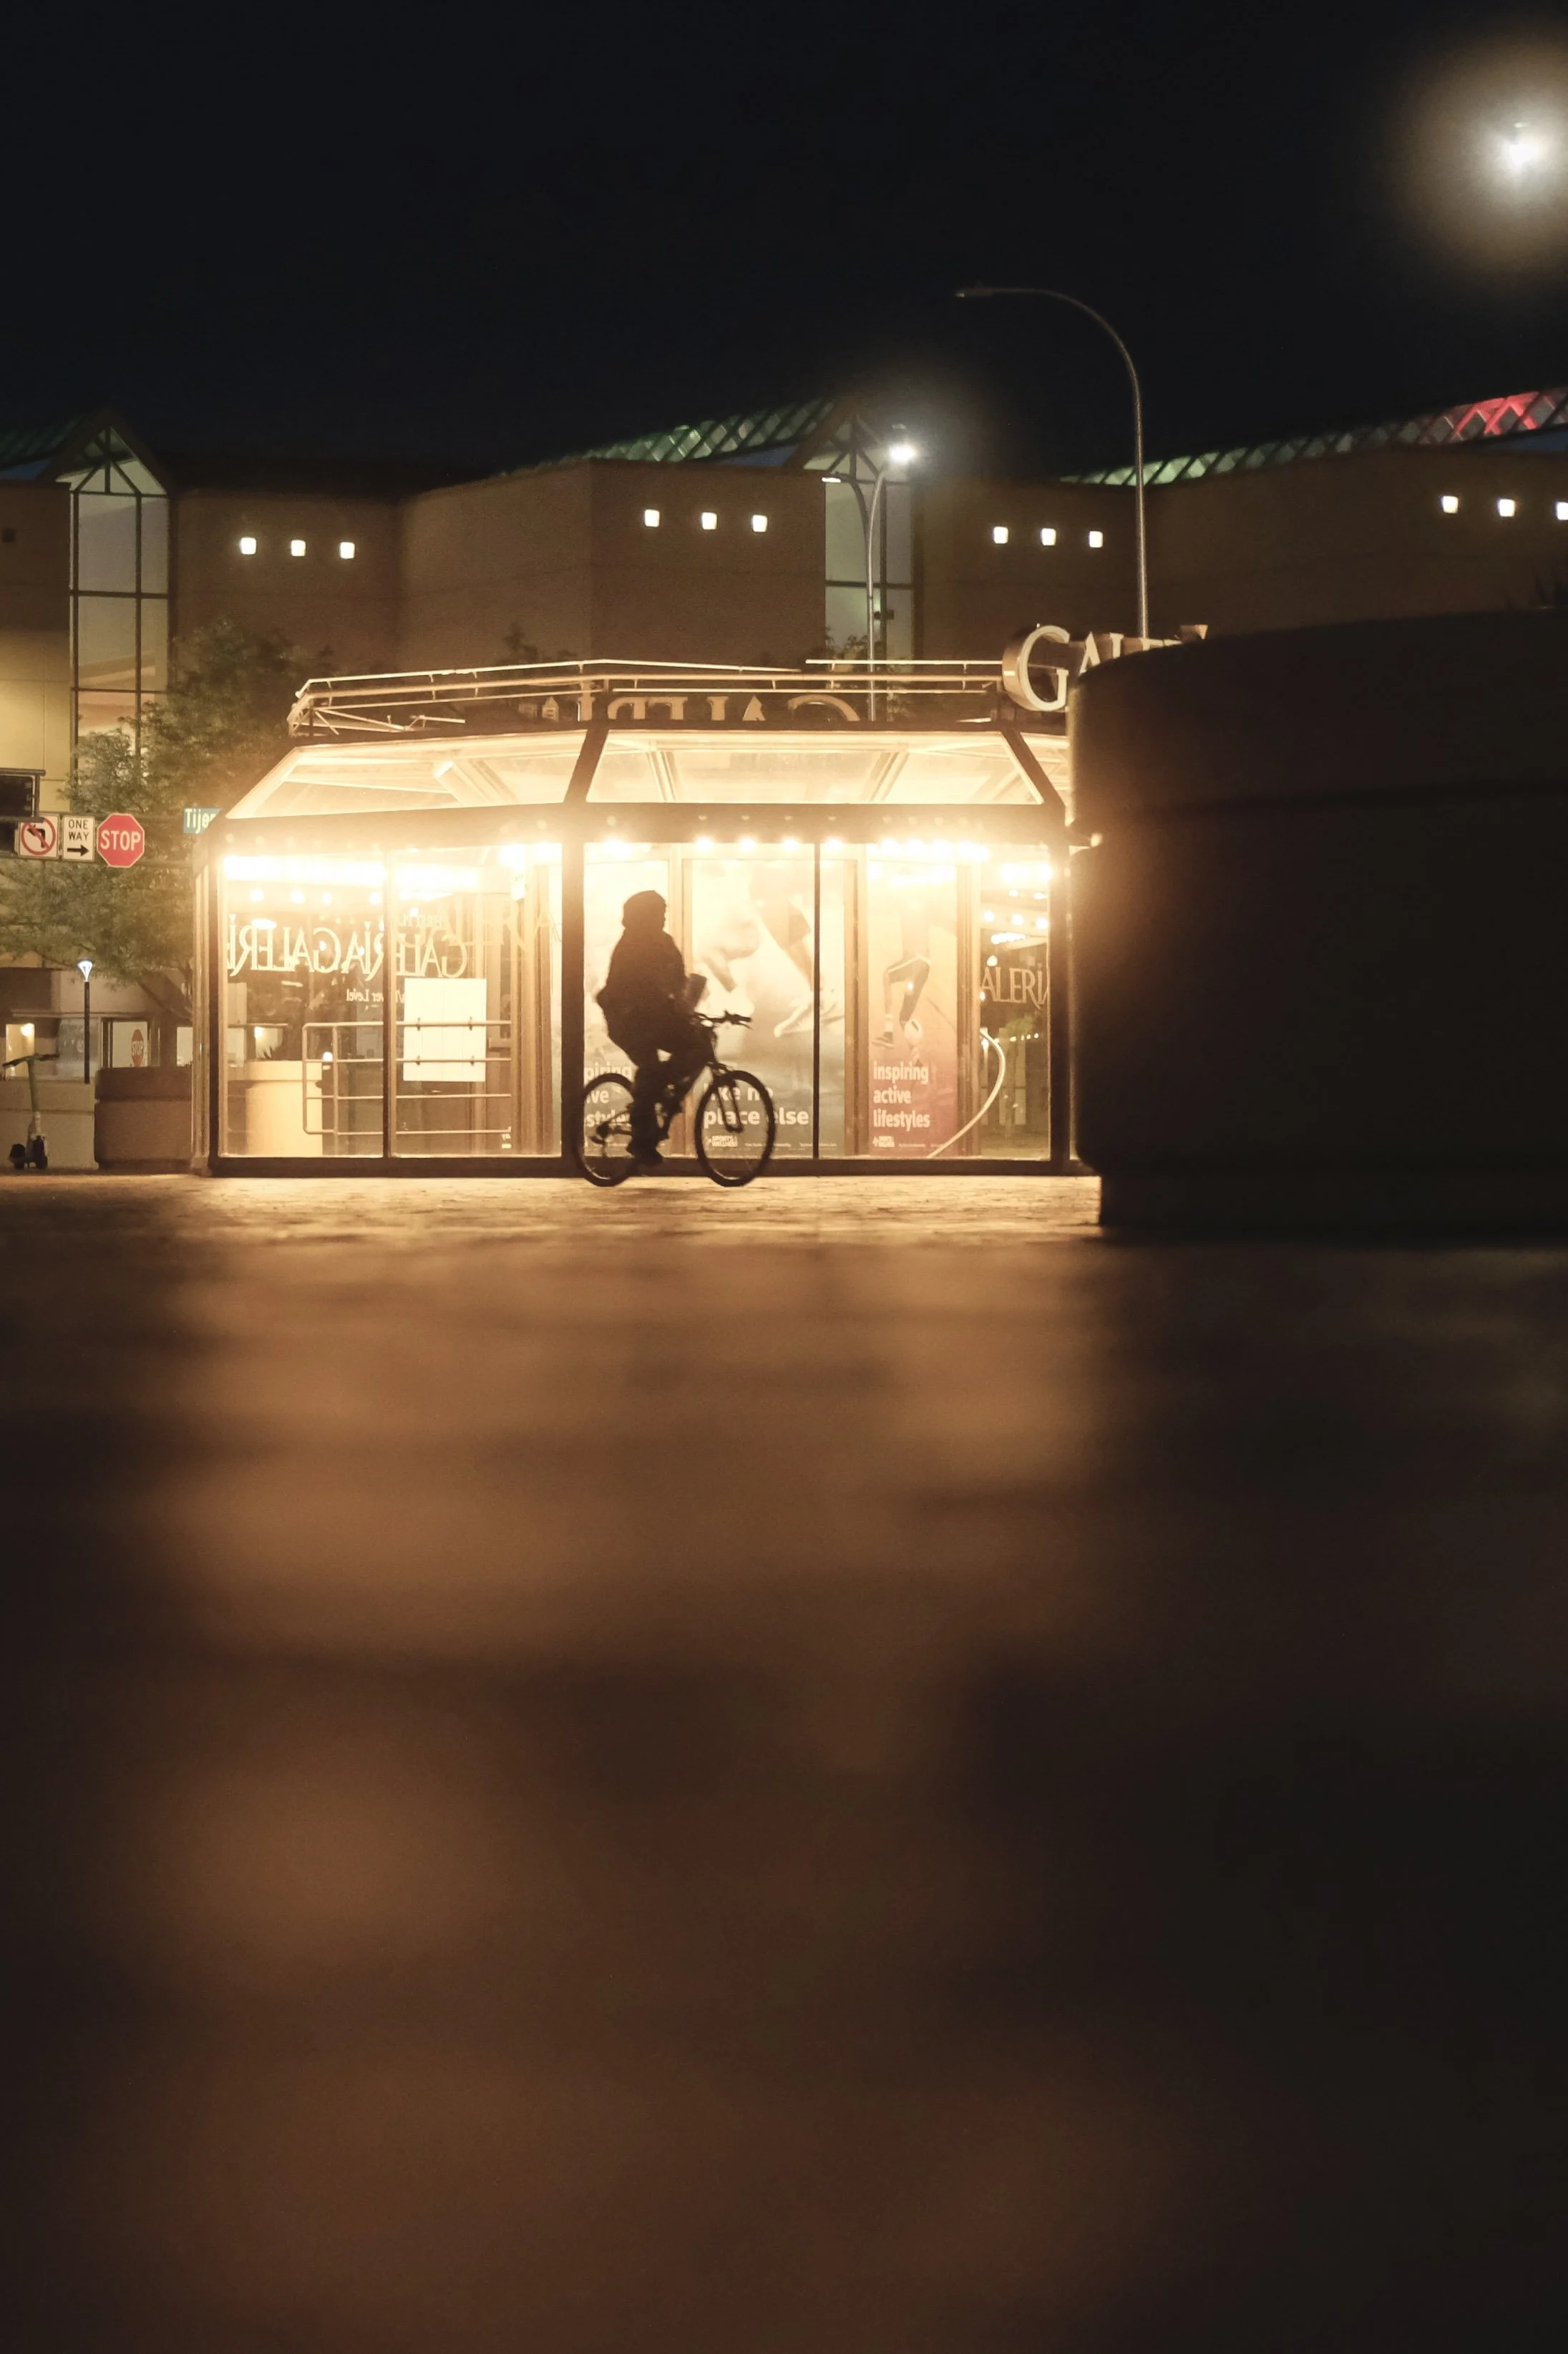
One-handed night-biking, downtown Albuquerque.
This photo illustrates a bunch of principles. First, notice the perspective. The camera is low to the ground again here, making areas near the lens blurry, which pushes your eye to the subject (the biker). Second, play with light. The glass structure behind the biker had very cool tungsten lights creating very cool reflections on the bricked ground. Use all of that! Third, be patient. I could have just taken a picture of the glass structure, and it would have been…ok I guess. But instead, I waited for about 15 minutes, standing there like a doofus, until this biker rode directly into my scene, giving the photo a sense of scale, time, movement, context, mystery (because he’s backlit), and just general interest. Wait around like a weirdo, and cool stuff might happen! Fourth, frame with intention. There’s some distracting stuff in this image—street signs, a scooter, ads, streetlights, random colors, Waldo from Where’s Waldo (kidding). So I did my best to minimize those things to focus on the subject (the biker). It can be tough to do this with really busy scenes like this one, so just do your best. I probably could have done better here.
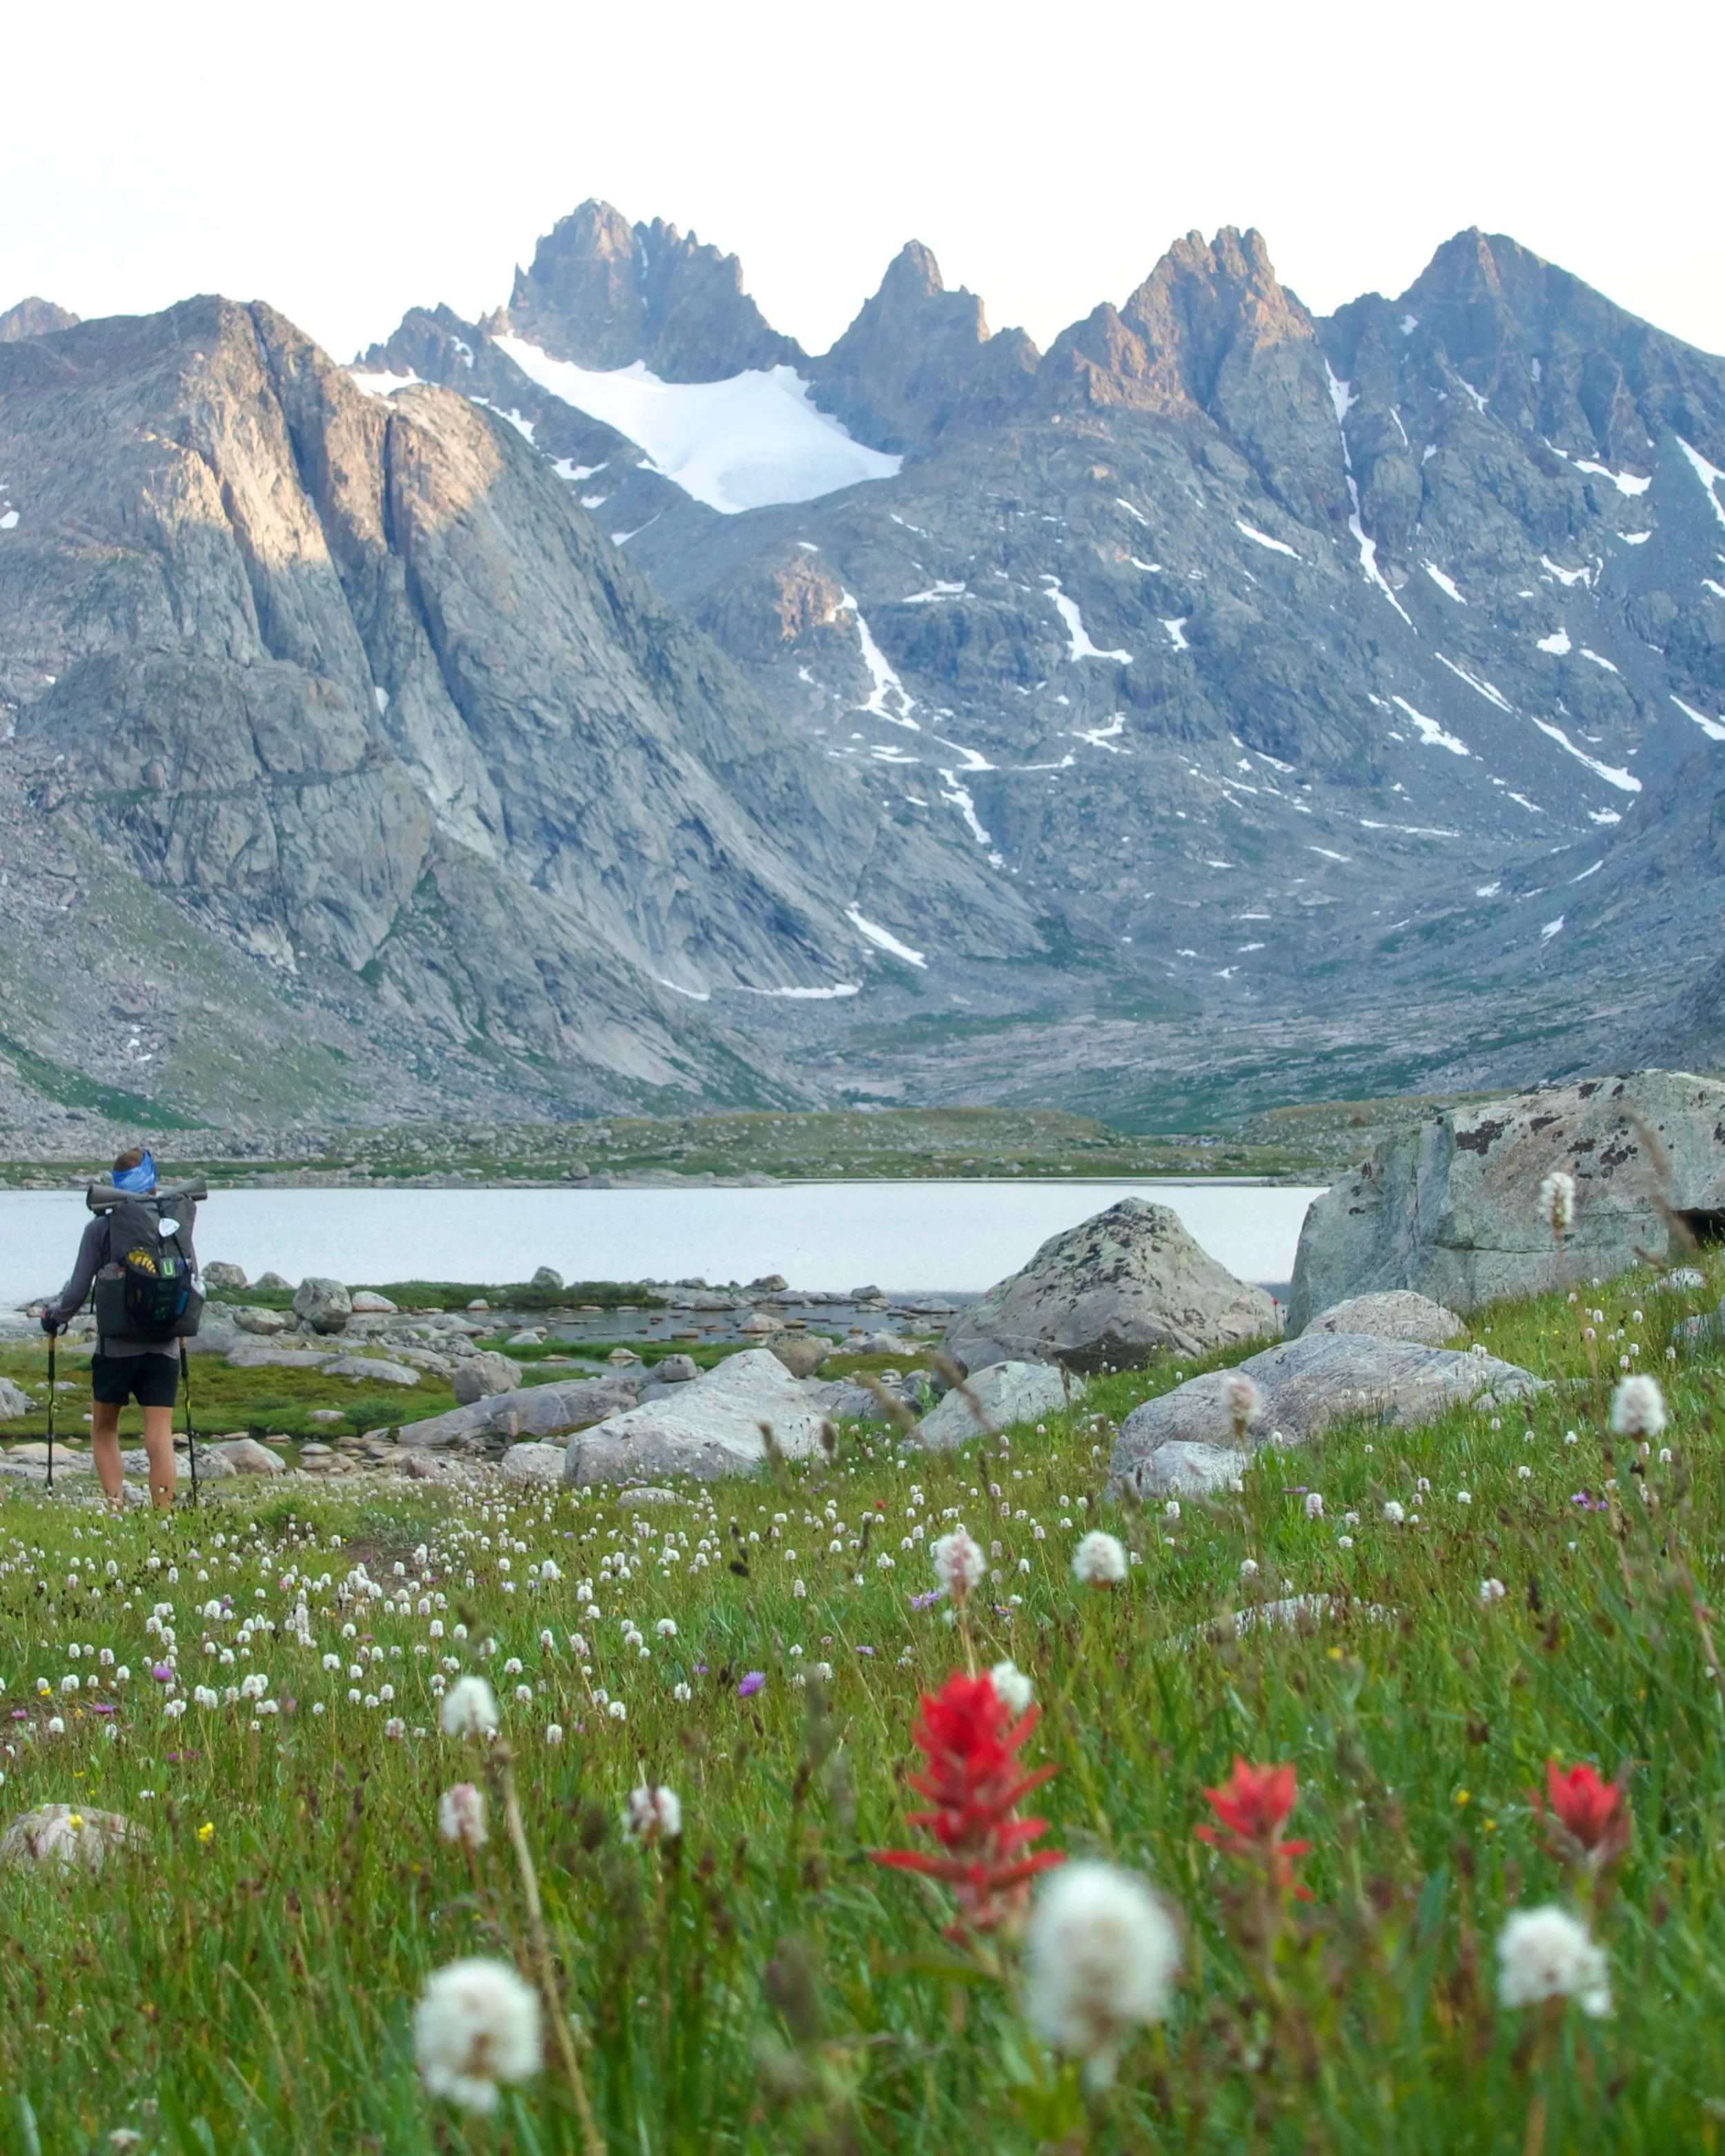
The Wind River Range in Wyoming on the CDT.
Don’t over-edit! I increased the exposure in this image by maybe a 1/4 of a stop to brighten things up and added maybe 5% color saturation. That’s it! Any more made the image look fake and weird to my eye. Use editing to enhance an already-good photo—avoid trying to turn a bad image into a good image through heavy editing. We’ve all done it, but it usually doesn’t work out very well. If you find yourself spending 45 minutes endlessly tweaking an image with a hundred different editing sliders, it might be time to move on. In the words of Regina George, stop trying to make “fetch” happen. (Am I old? I’m old…)
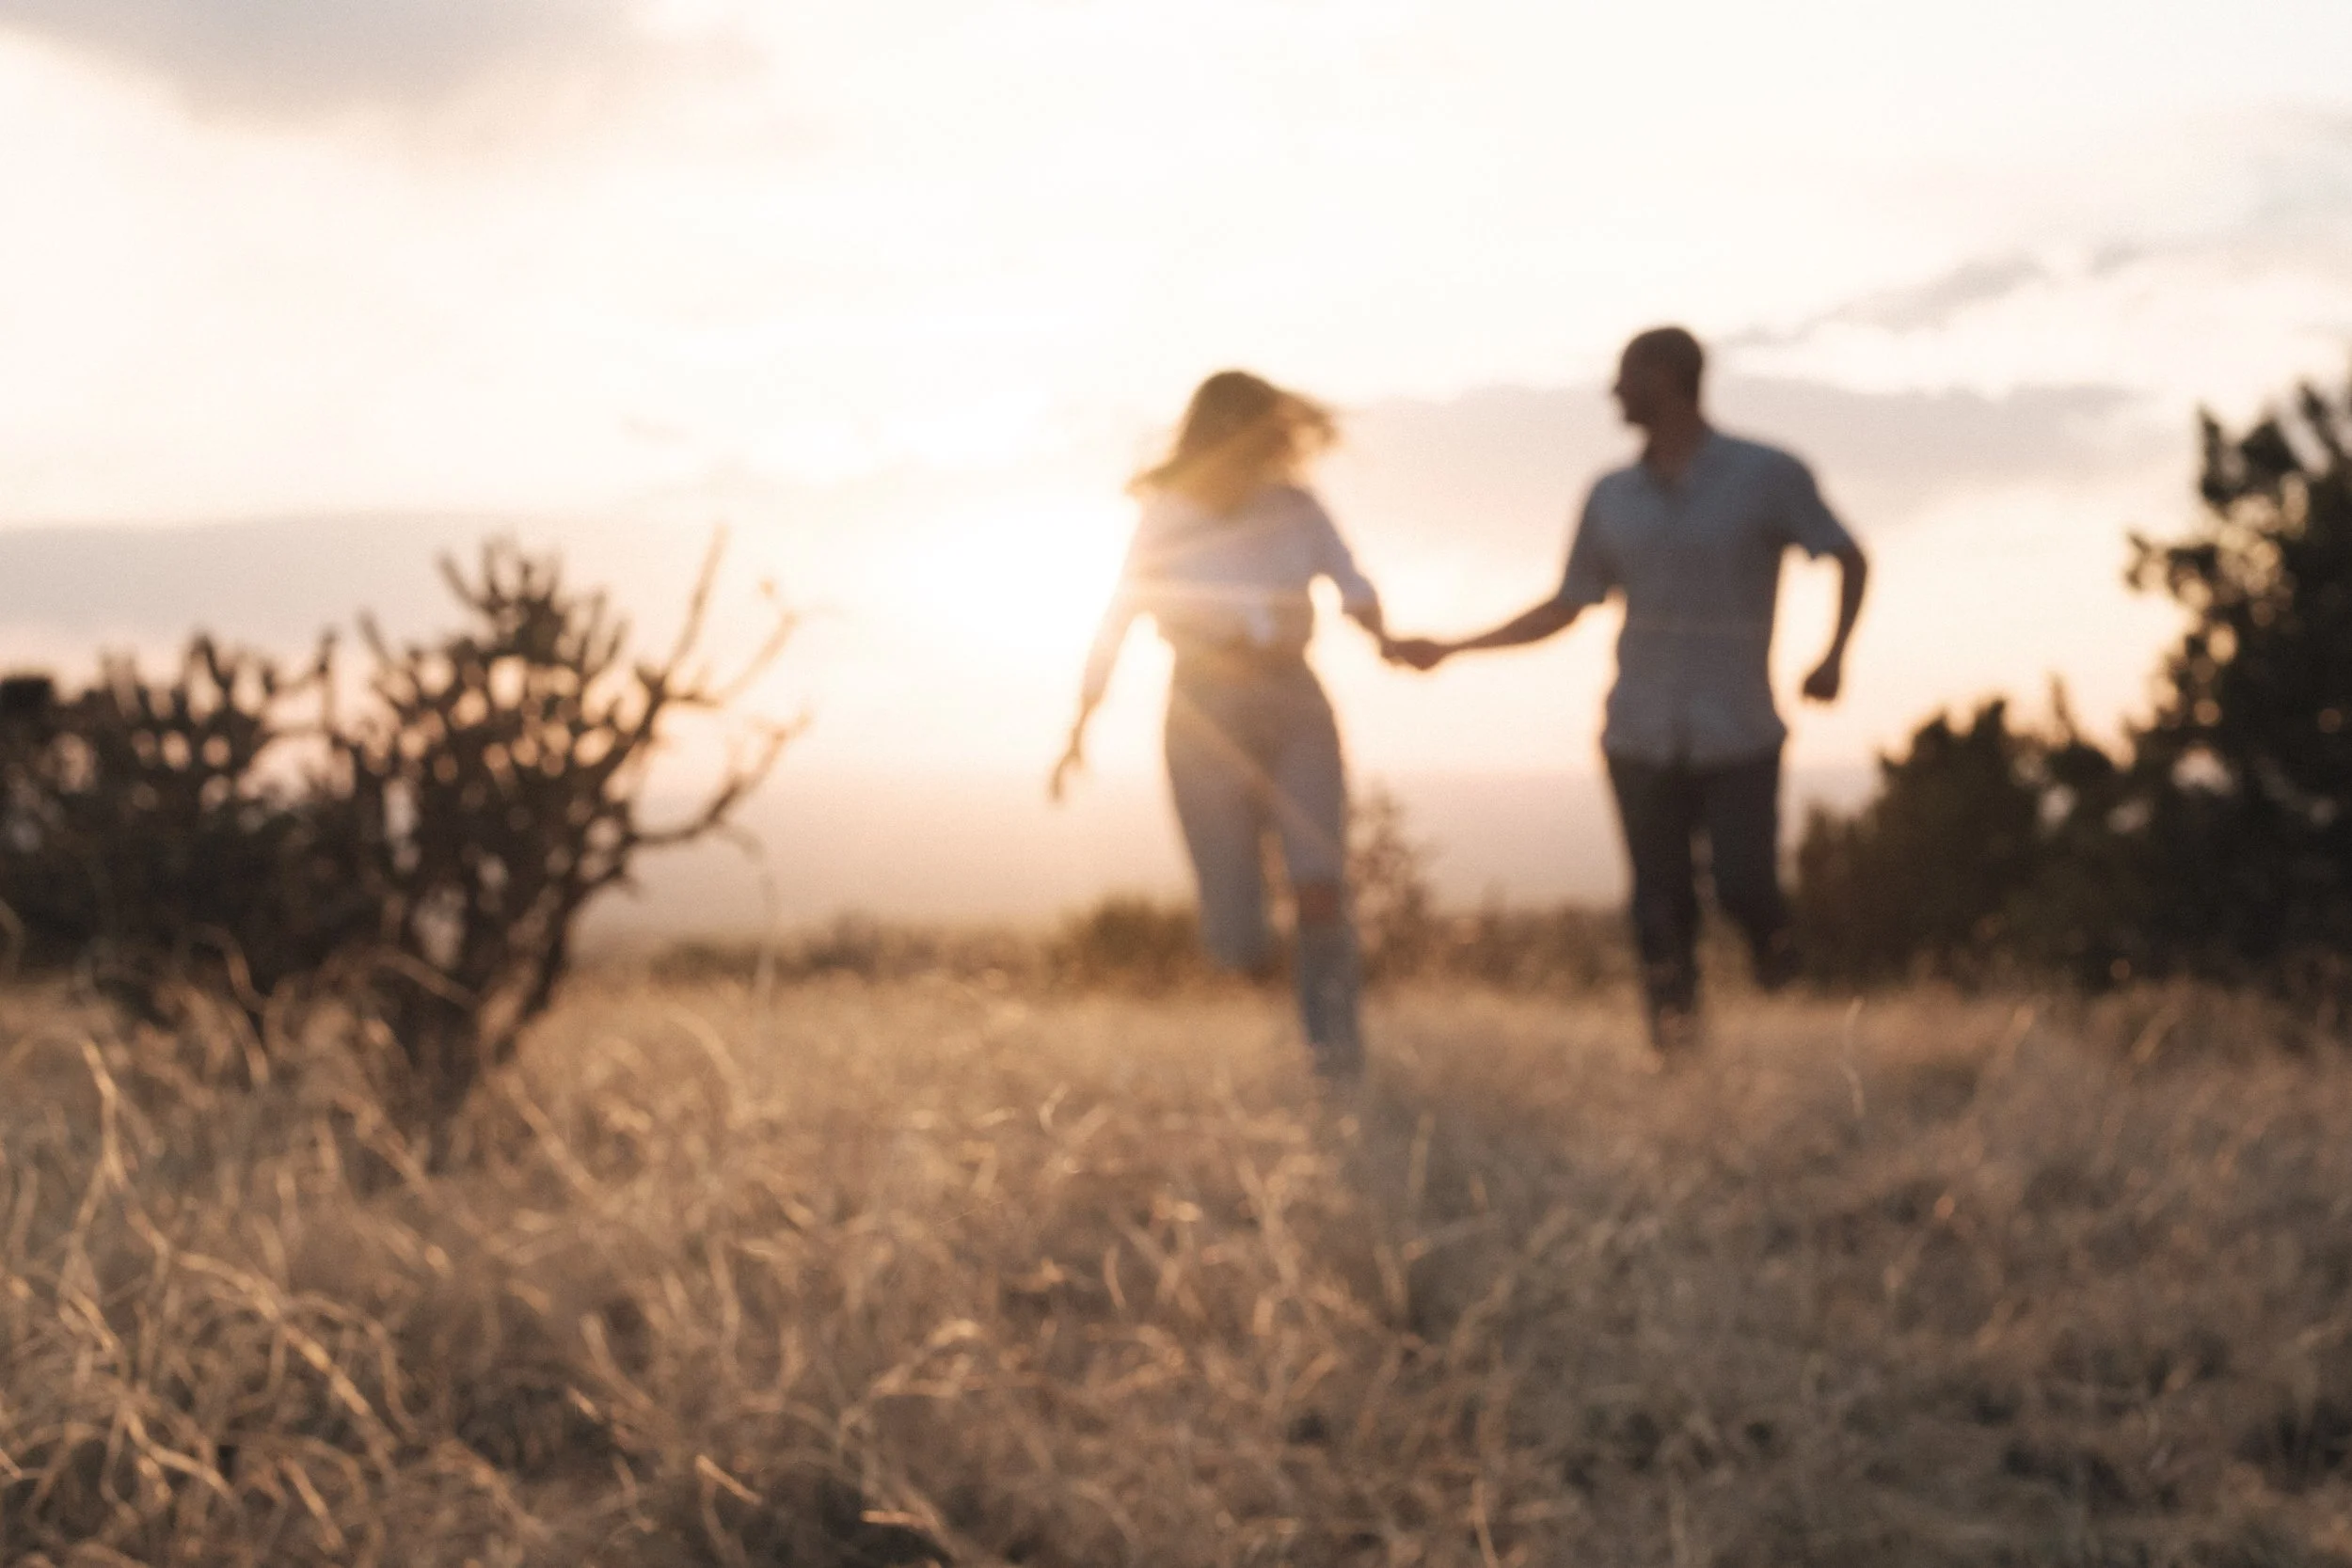
Desert frolicking at sunset in Albuquerque.
Light is everything in photography! My camera missed focus here. But the evening light was beautiful—soft, directional, warm. So I ended up really liking this photo, as did my clients. Great lighting can lead to happy accidents.
Tip #4: Take A LOT of Photos!
My last tip is this: Practice! Like…a lot! Bring your camera (or at least your phone camera) with you everywhere that it’s feasible, every day, and take a million photos of all kinds of stuff. Experiment with reckless abandon. Take pictures of big things, small things, boring things, interesting things, colorful things, drab things. Take pictures on sunny days, cloudy days, stormy days, days when you feel like shooting, days when you don’t feel like shooting. Take pictures outdoors, indoors, in beautiful lighting, in boring lighting, at night, during the day. When you feel stuck or bored or uninspired, simply do this: Take more pictures! Use your camera, use your phone, use whatever you have. It simply doesn’t matter. Just get out there and take pictures, every day that you can. No excuses, no judgment, no regrets. Delete the bad photos and keep the good ones. Measure your progress. See how your taste improves and changes. It is only by taking pictures and examining your own work that you will improve and start to develop your own style. Because to be truly good at something, you must first be willing to be truly bad at something. Swallow your pride, ignore your ego, and go take a million photos. This is the way.
* * *
I hope you find these tips helpful! All the best to you in your photography journey! Feel free to reach out with any questions along the way: ben@bensnaps-photo.com. Also feel free to reach out through Instagram: @_ben_snaps_. You can also subscribe to my newsletter below, where I’ll send you updates by email when my new blog posts go live!